Introduction
Let us walk you through getting started with LinePilot! First, let’s cover some definitions to help you understand how LinePilot works:
- Templates – LinePilot works using templates, these contain the settings for how line items are set up on your deals. You would usually have a different template for each type of product you sell
- Runs – a run is each time the template gets to work on one of your deals
- Trigger – controls when a template is run
- Filter – controls which deals a template is triggered on
We dive into more depth about each these on our Triggers, Runs and Filters article.
We’re going to start with a simple example just to show you the basics. To save our sales team from having to add a line item manually, we’re going to add just one product automatically when the deal moves to our quote stage. Then, we’ll use the deal amount property from HubSpot, and use that as the value of our product.
Setting up your template
First – if you’re not already – you need to be logged in to LinePilot, and have set up the app – check out getting started article if you need help with this part.
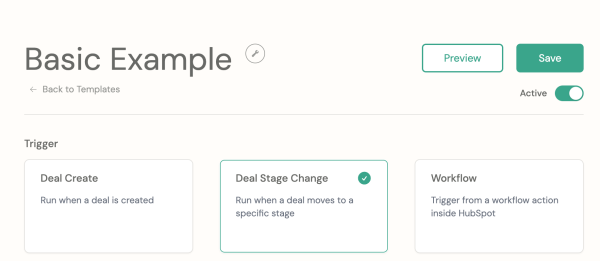
During the onboarding you’ll have been prompted to enter a name and create a template, so log in and head to your template’s settings page from your dashboard if you’re not already there. The top of your page should look something like this:

The first thing we need to do, is pick a trigger. We want LinePilot to run when the deal stage changes, but you can choose when a deal is created or with our Pro plan you can even use Workflow triggers. This list shows all of my pipeline stages, for ours we’re going to choose “Quote Prepared” as our deal stage.

Next let’s add a filter so we only run LinePilot for new business deals. Click “Add Filter” and you’ll be able to choose from a list of your deal properties. We’re going to pick “Deal Type” and “New Business” for our filter.

Adding products to your template
Now I can add my product. If you’re using the HubSpot product library, just search for an existing product here. We’re going to add one we have already called Software Subscription Level 1. If you don’t have products set up on HubSpot, you can add the product in manually by clicking “Add Blank Line Item” and picking a Name and SKU code.

Remember at the beginning we said we wanted to use the deal amount? Let’s replace the value from the product library with what’s in our deal. In the line item you’ll see a list if line item properties that you can choose to set, choose Unit Price.
Then we’re going to choose “use deal property” to use a value from our deal, and pick “Amount” from our deal properties. Now each time LinePilot runs, it will grab that info from the deal and use it when adding your line.

Final steps
And that’s pretty much. it! You can even preview it on the template screen, and once you’re happy – make it active.

Back in HubSpot, when you move your deal to Quote Prepared, you should see the new line has been added with the deal amount, ready for quotes, reports, invoices – whatever you need it for.

We hope you found that helpful as an introduction – why not explore our next tutorial which dives into more detail about building line items.

